Full Size Tape Rendering Tutorial
Introduction
During my studies at the Royal College of Art I had seen full size tape renderings and had heard about how they were made, but I never actually did one there. So when I joined the Volvo Car BV studio I was very keen on actually developing that skill. Nobody within that studio had even done them either so I had to find the materials needed and just learn by trial and error. I will add some examples of that work in the gallery.

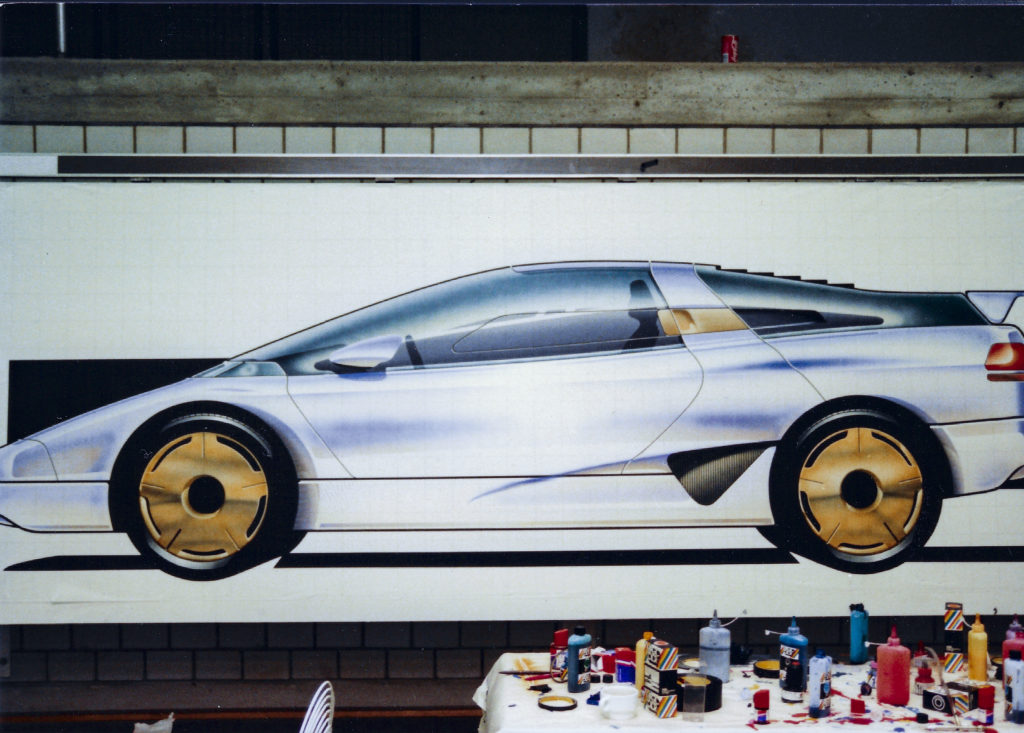
After 4 years of doing these I convinced my boss at Volvo, Rob Koch, that an advertised 1 week course by the Fachhochschule Pforzheim would be a good thing since it would finally allow me to learn from others and improve on my skills. He agreed in early 1988 I embarked on this course in Pforzheim, taught by Professor Gerhard Friedrich. There was an international group of students for this course coming from as far away as Brazil and Argentina, all keen to learn. During that course I took photos of the several stages and I am using these to illustrate the process below.
After leaving Volvo for Mercedes-Benz and later Mazda Europe I further developed my skills in this. The tape drawings we made at Mazda in Europe were sent to the Japan studios so we never saw them back. When I finally got to visit the Yokohama Mazda Design Studio I saw the bad state of those tape renderings. Due to the humidity in Japan most of the actual tapes had let go of the Vellum so they were a pretty sad sight.
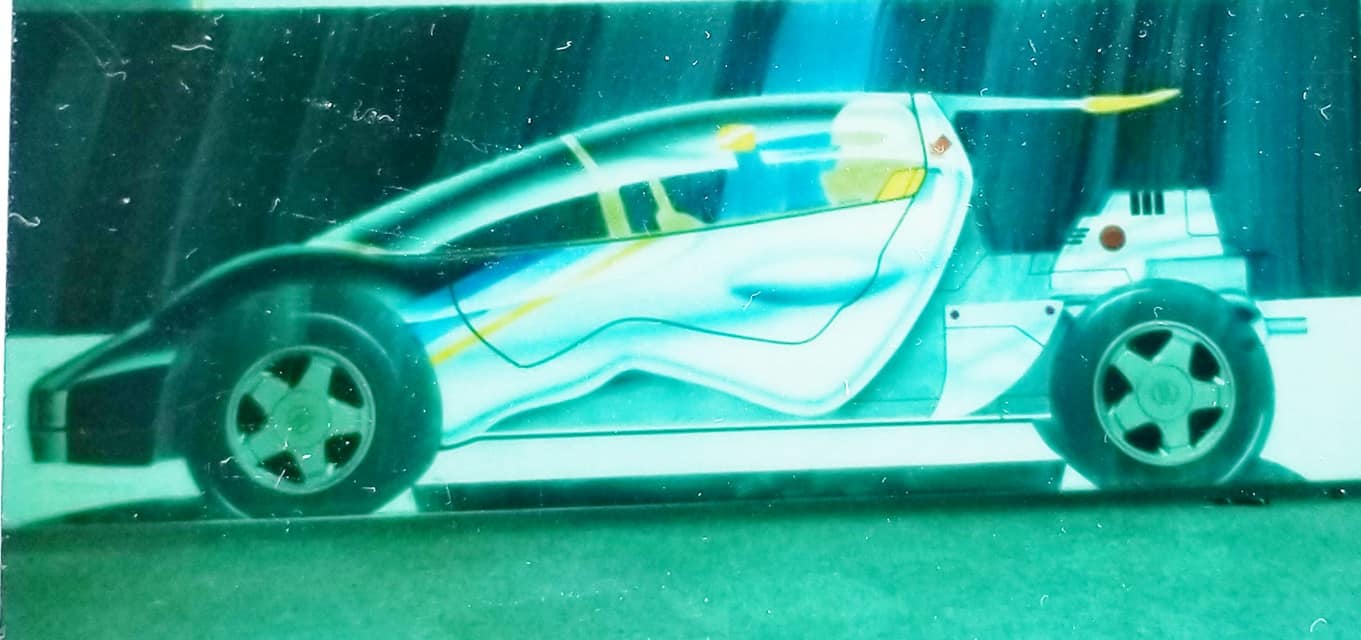
Coming back from that trip I challenged myself to remedy that issue by actually masking off the tape lines themselves and airbrushing them as well, so that the finished rendering did not contain a single tape anymore. I hope it arrived in Japan in a good condition. That last tape rendering, the green one in the gallery, was executed in 12 hours total, including rendering the tape lines, far shorter than the times it took me to do my first ones at Volvo.
Tutorial
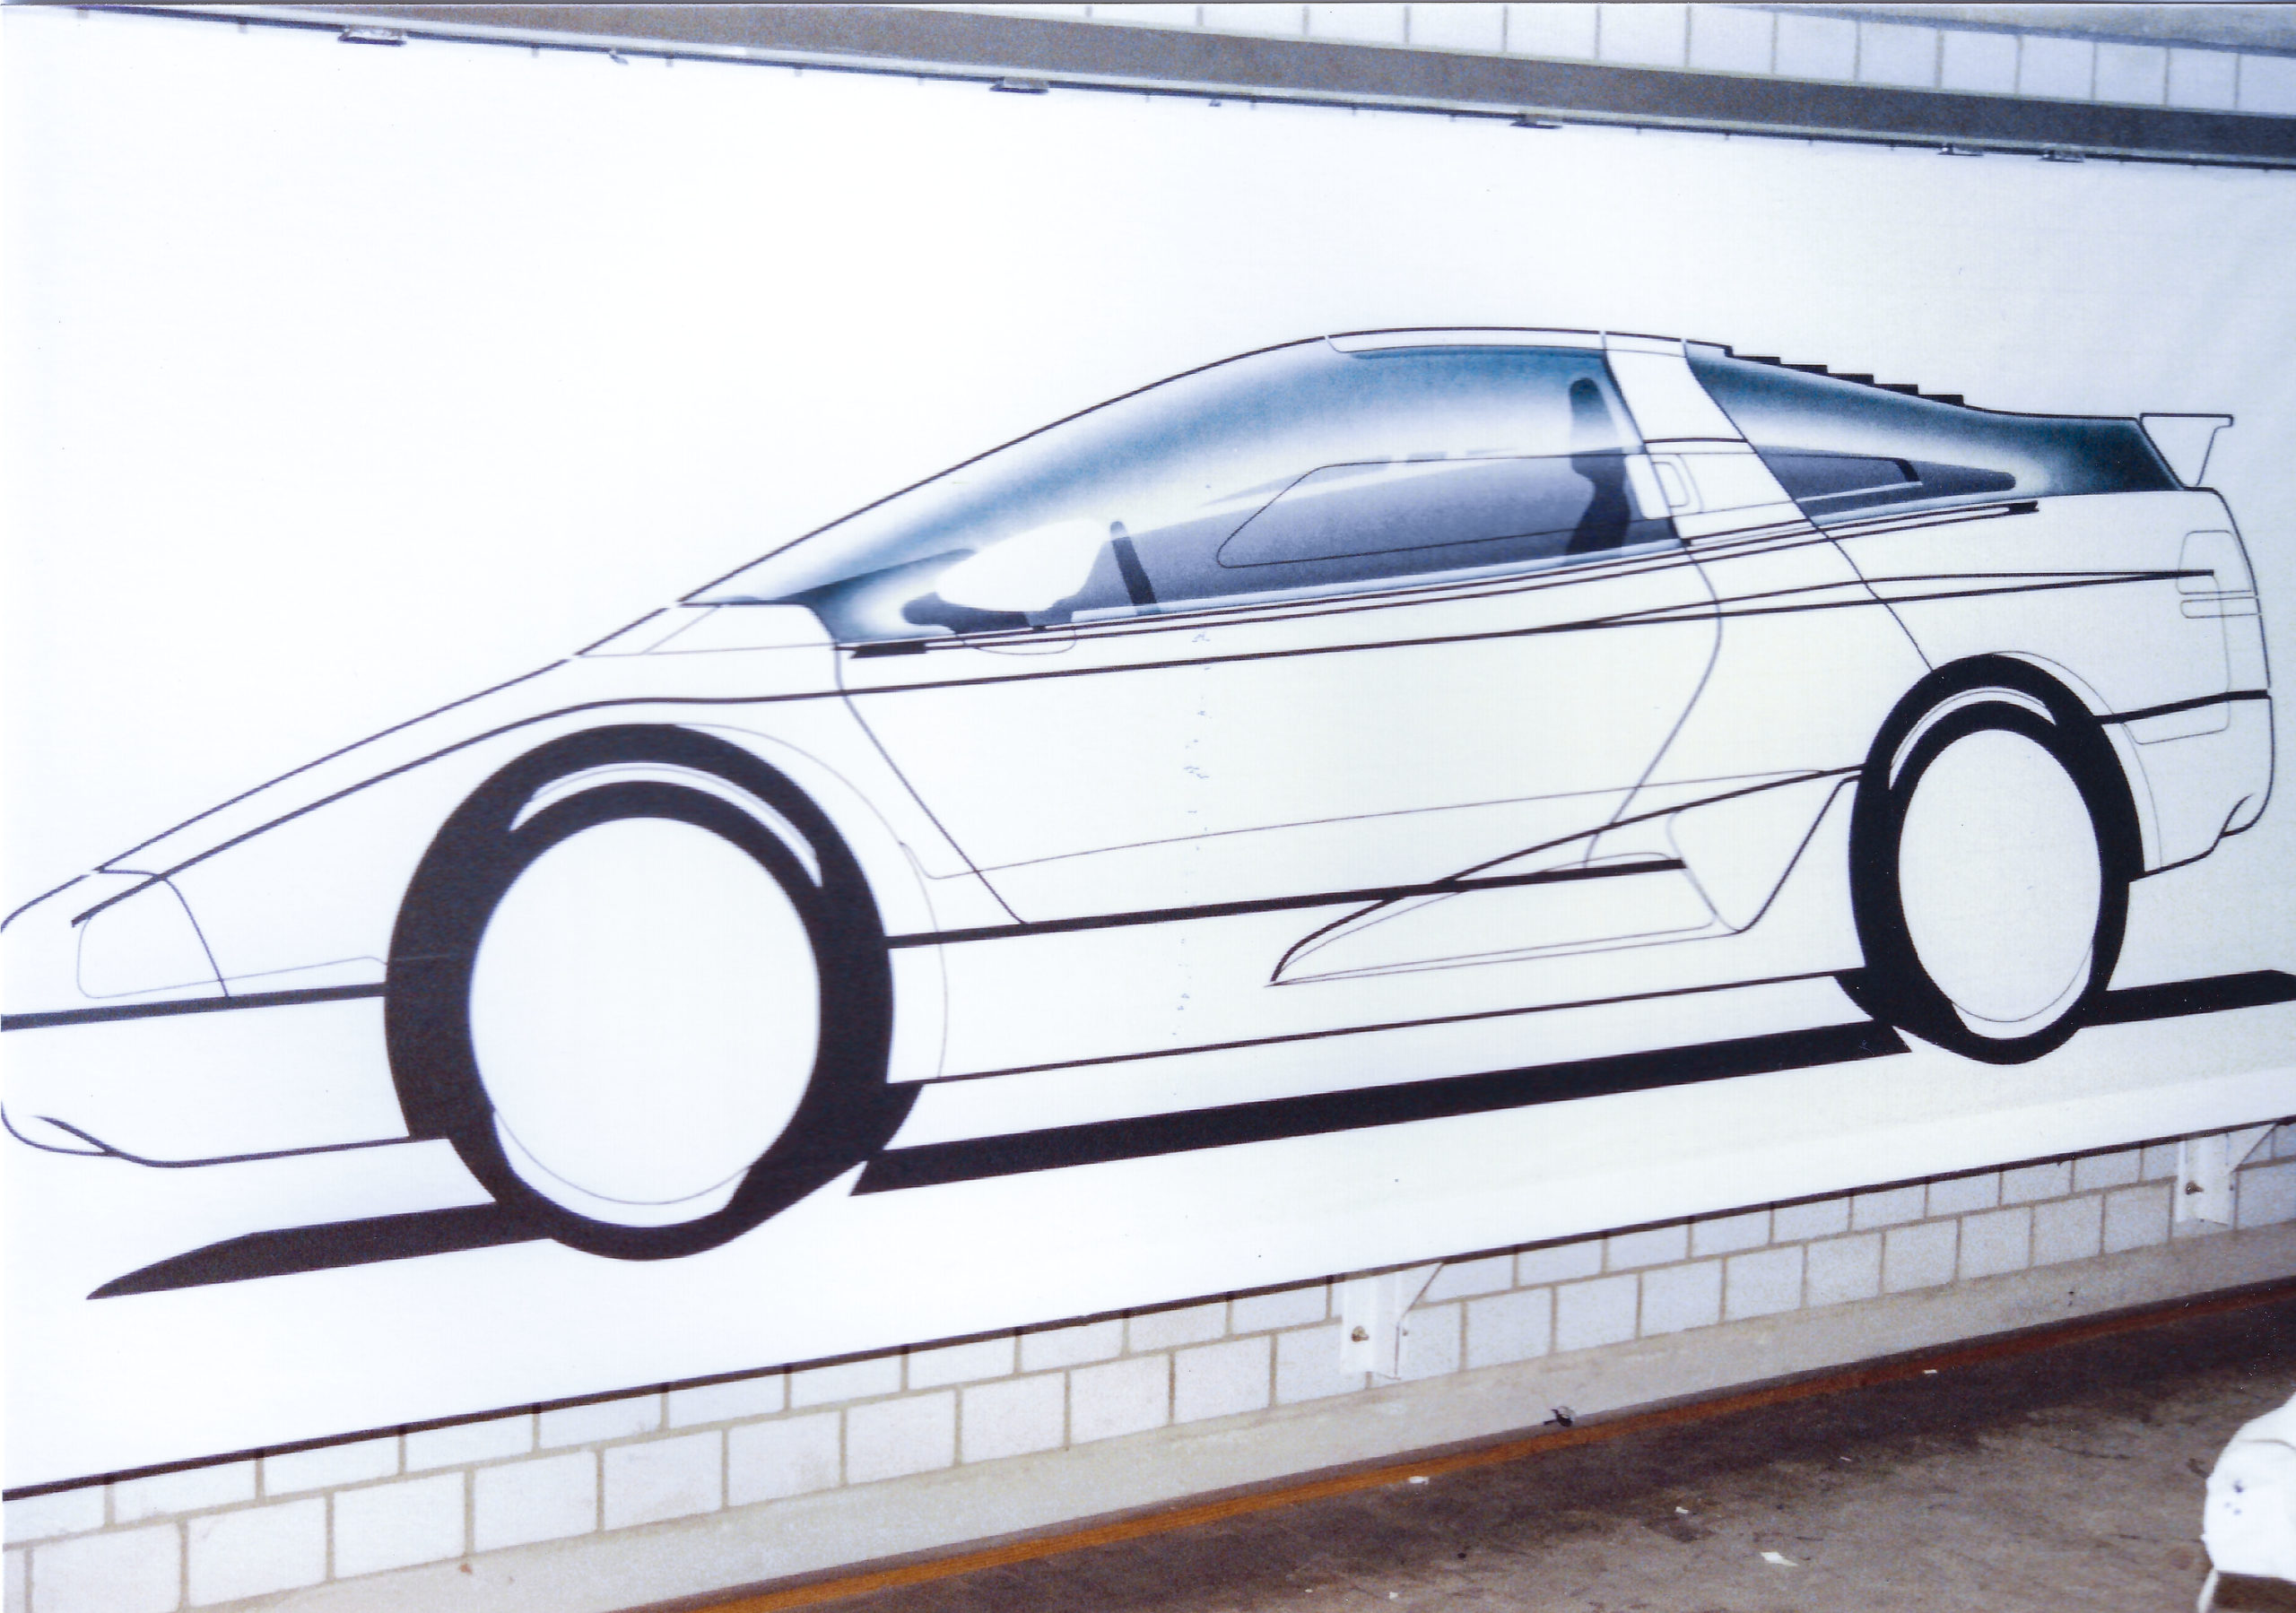
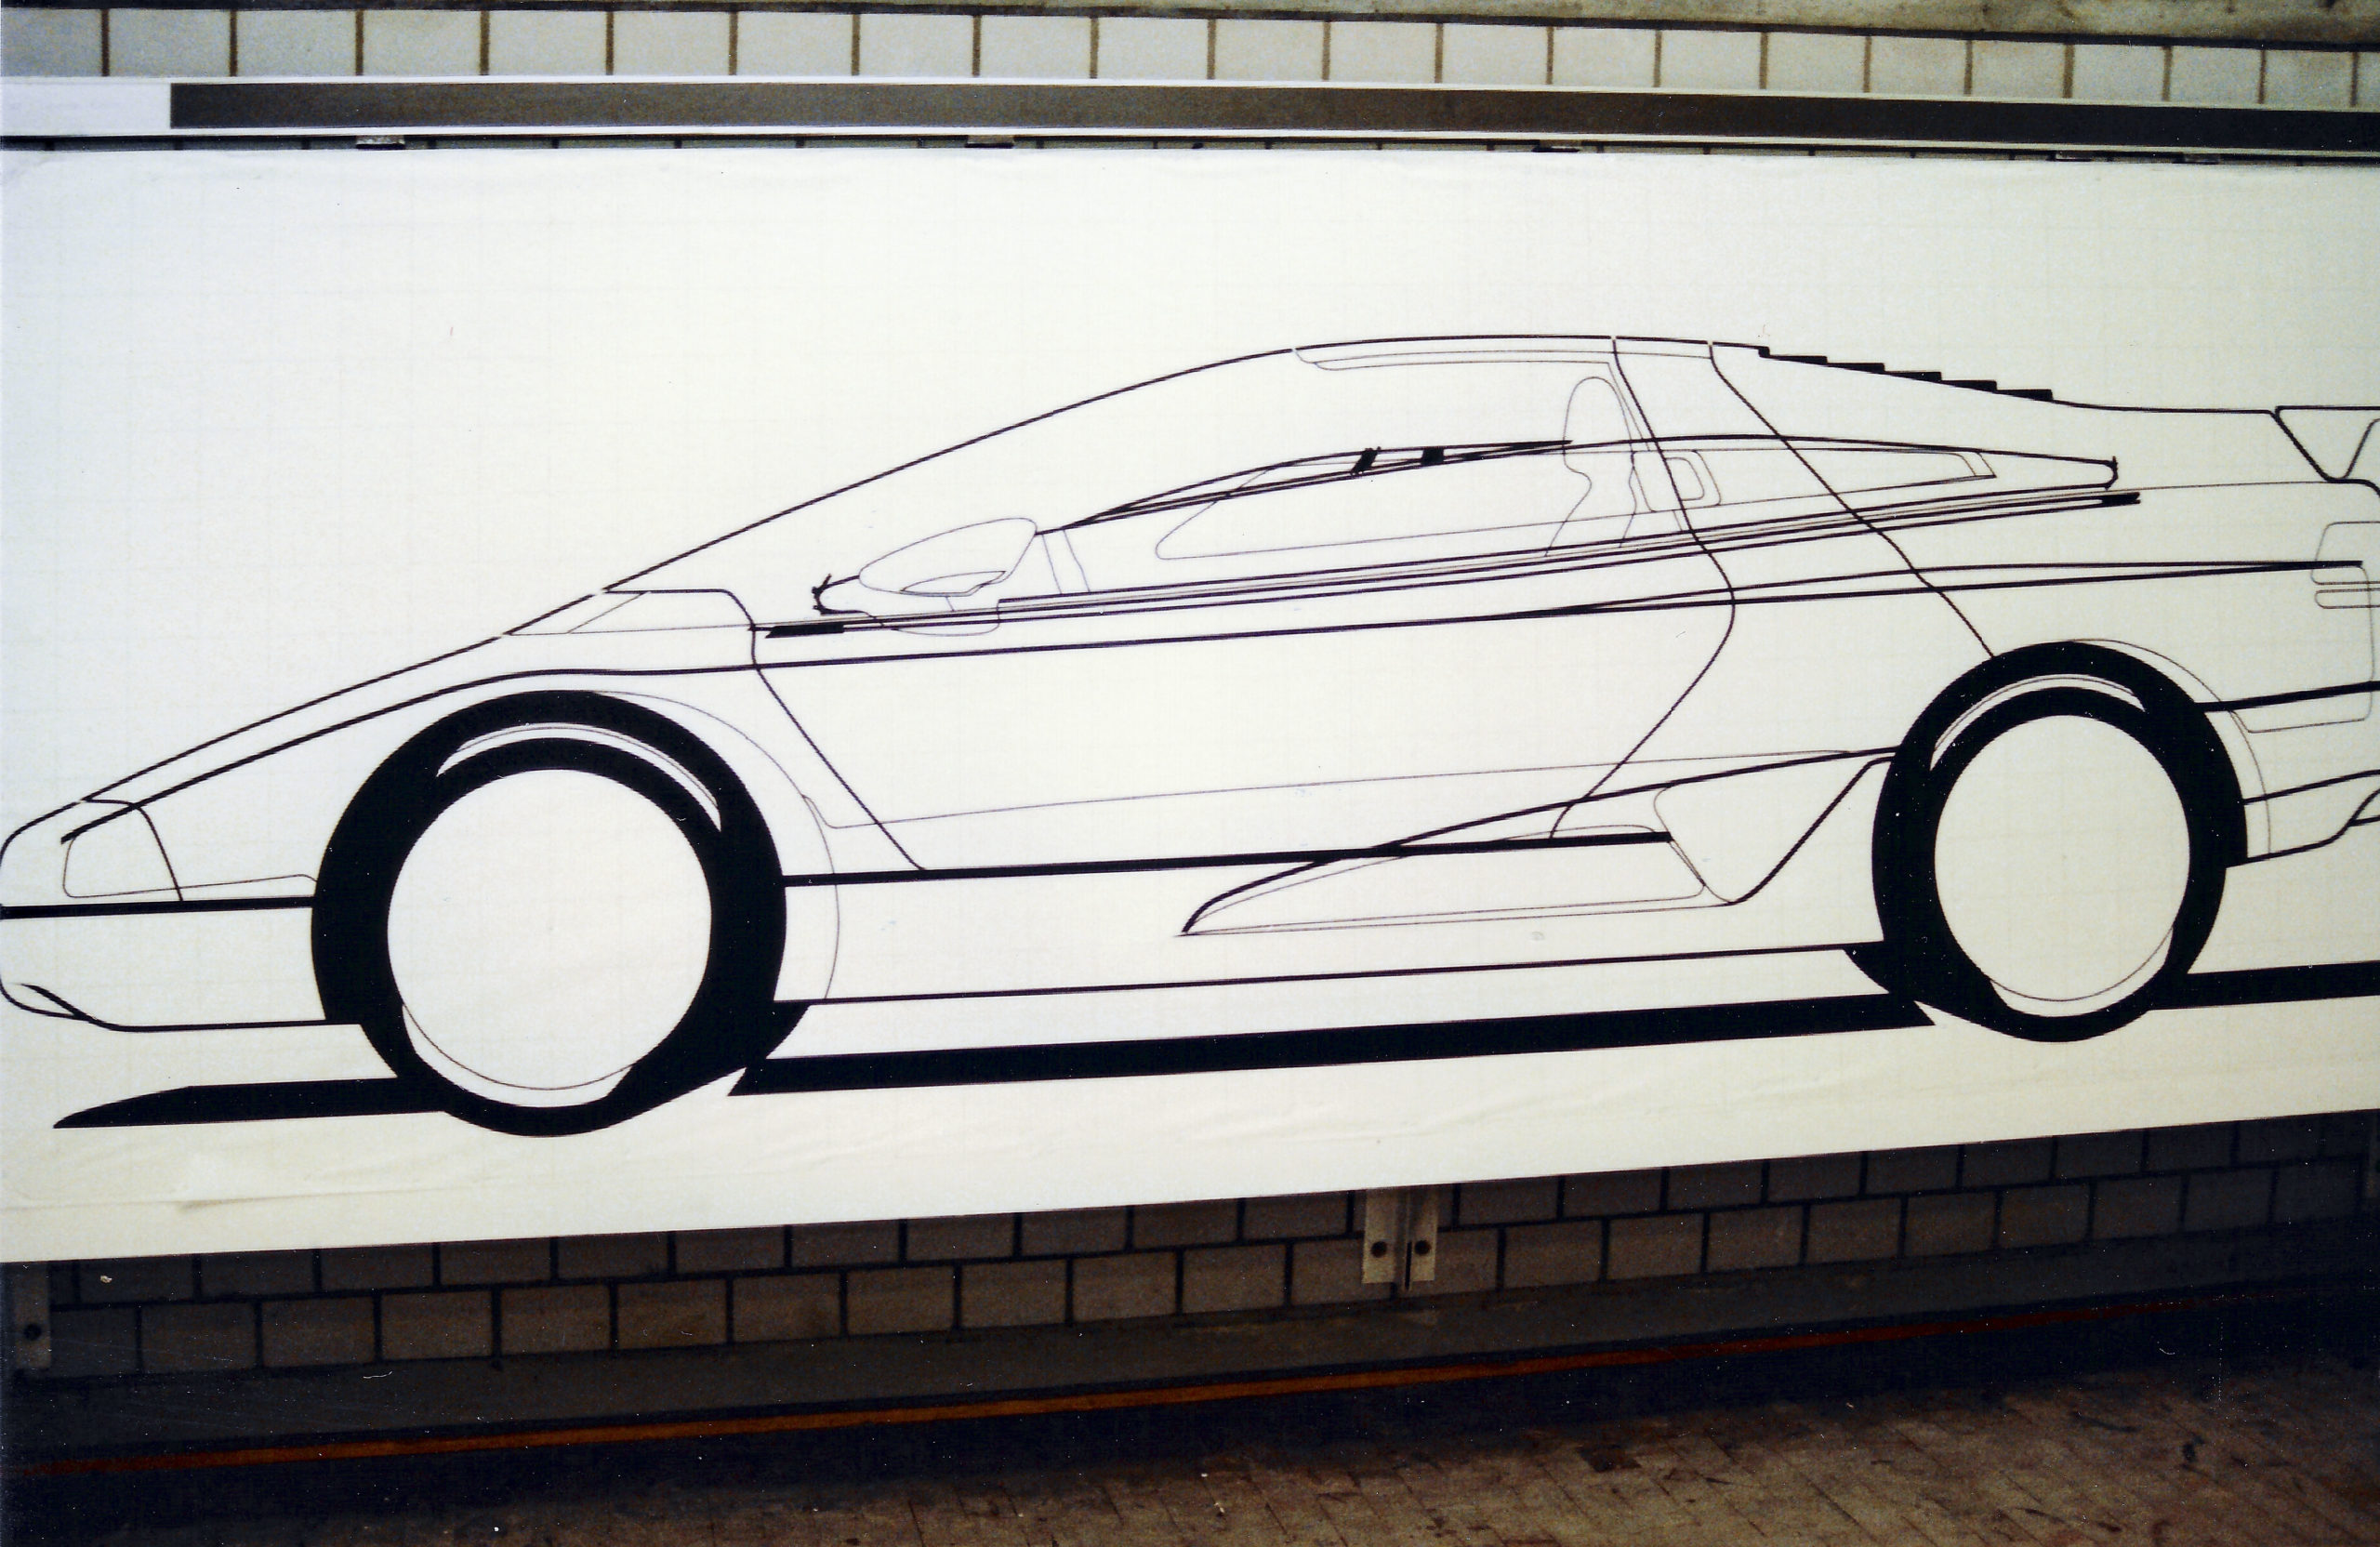
In the full size tape phase of a project you have already established the basic package dimensions like wheelbase, front overhang, rear overhang and height. For front and rear view tapes the width is also established. For production programs we generally had full size engineering drawings as underlays where we were forced to stick to the set limitations, such as front window angle, door cut placements, vision angles front and rear etc.
Based on all of that we would start applying the first main character lines with thicker tapes and the then blocking in the ground surface and tires areas with the thickest of black tapes. Flexible black masking tapes are available from very thin, 1 mm, through to very wide, 200 mm and above.

To make sure the tapes you applied are perfect in curvature you pull another, thicker tape along side it while looking at the placed tape from an angle close to the board. That way you can spot uneven areas easily and correct them.
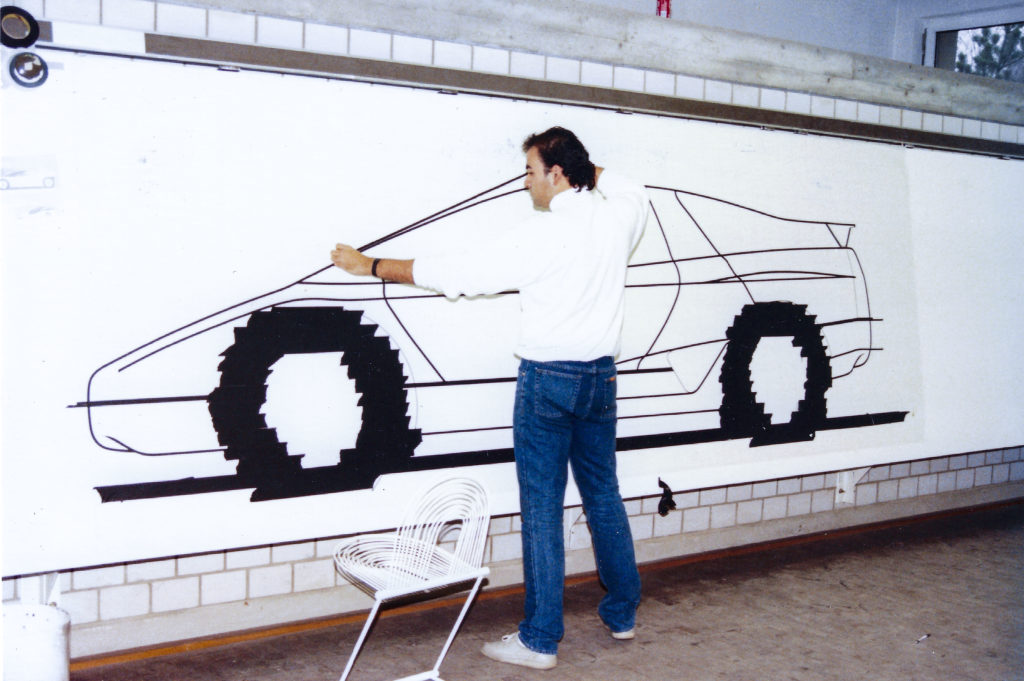
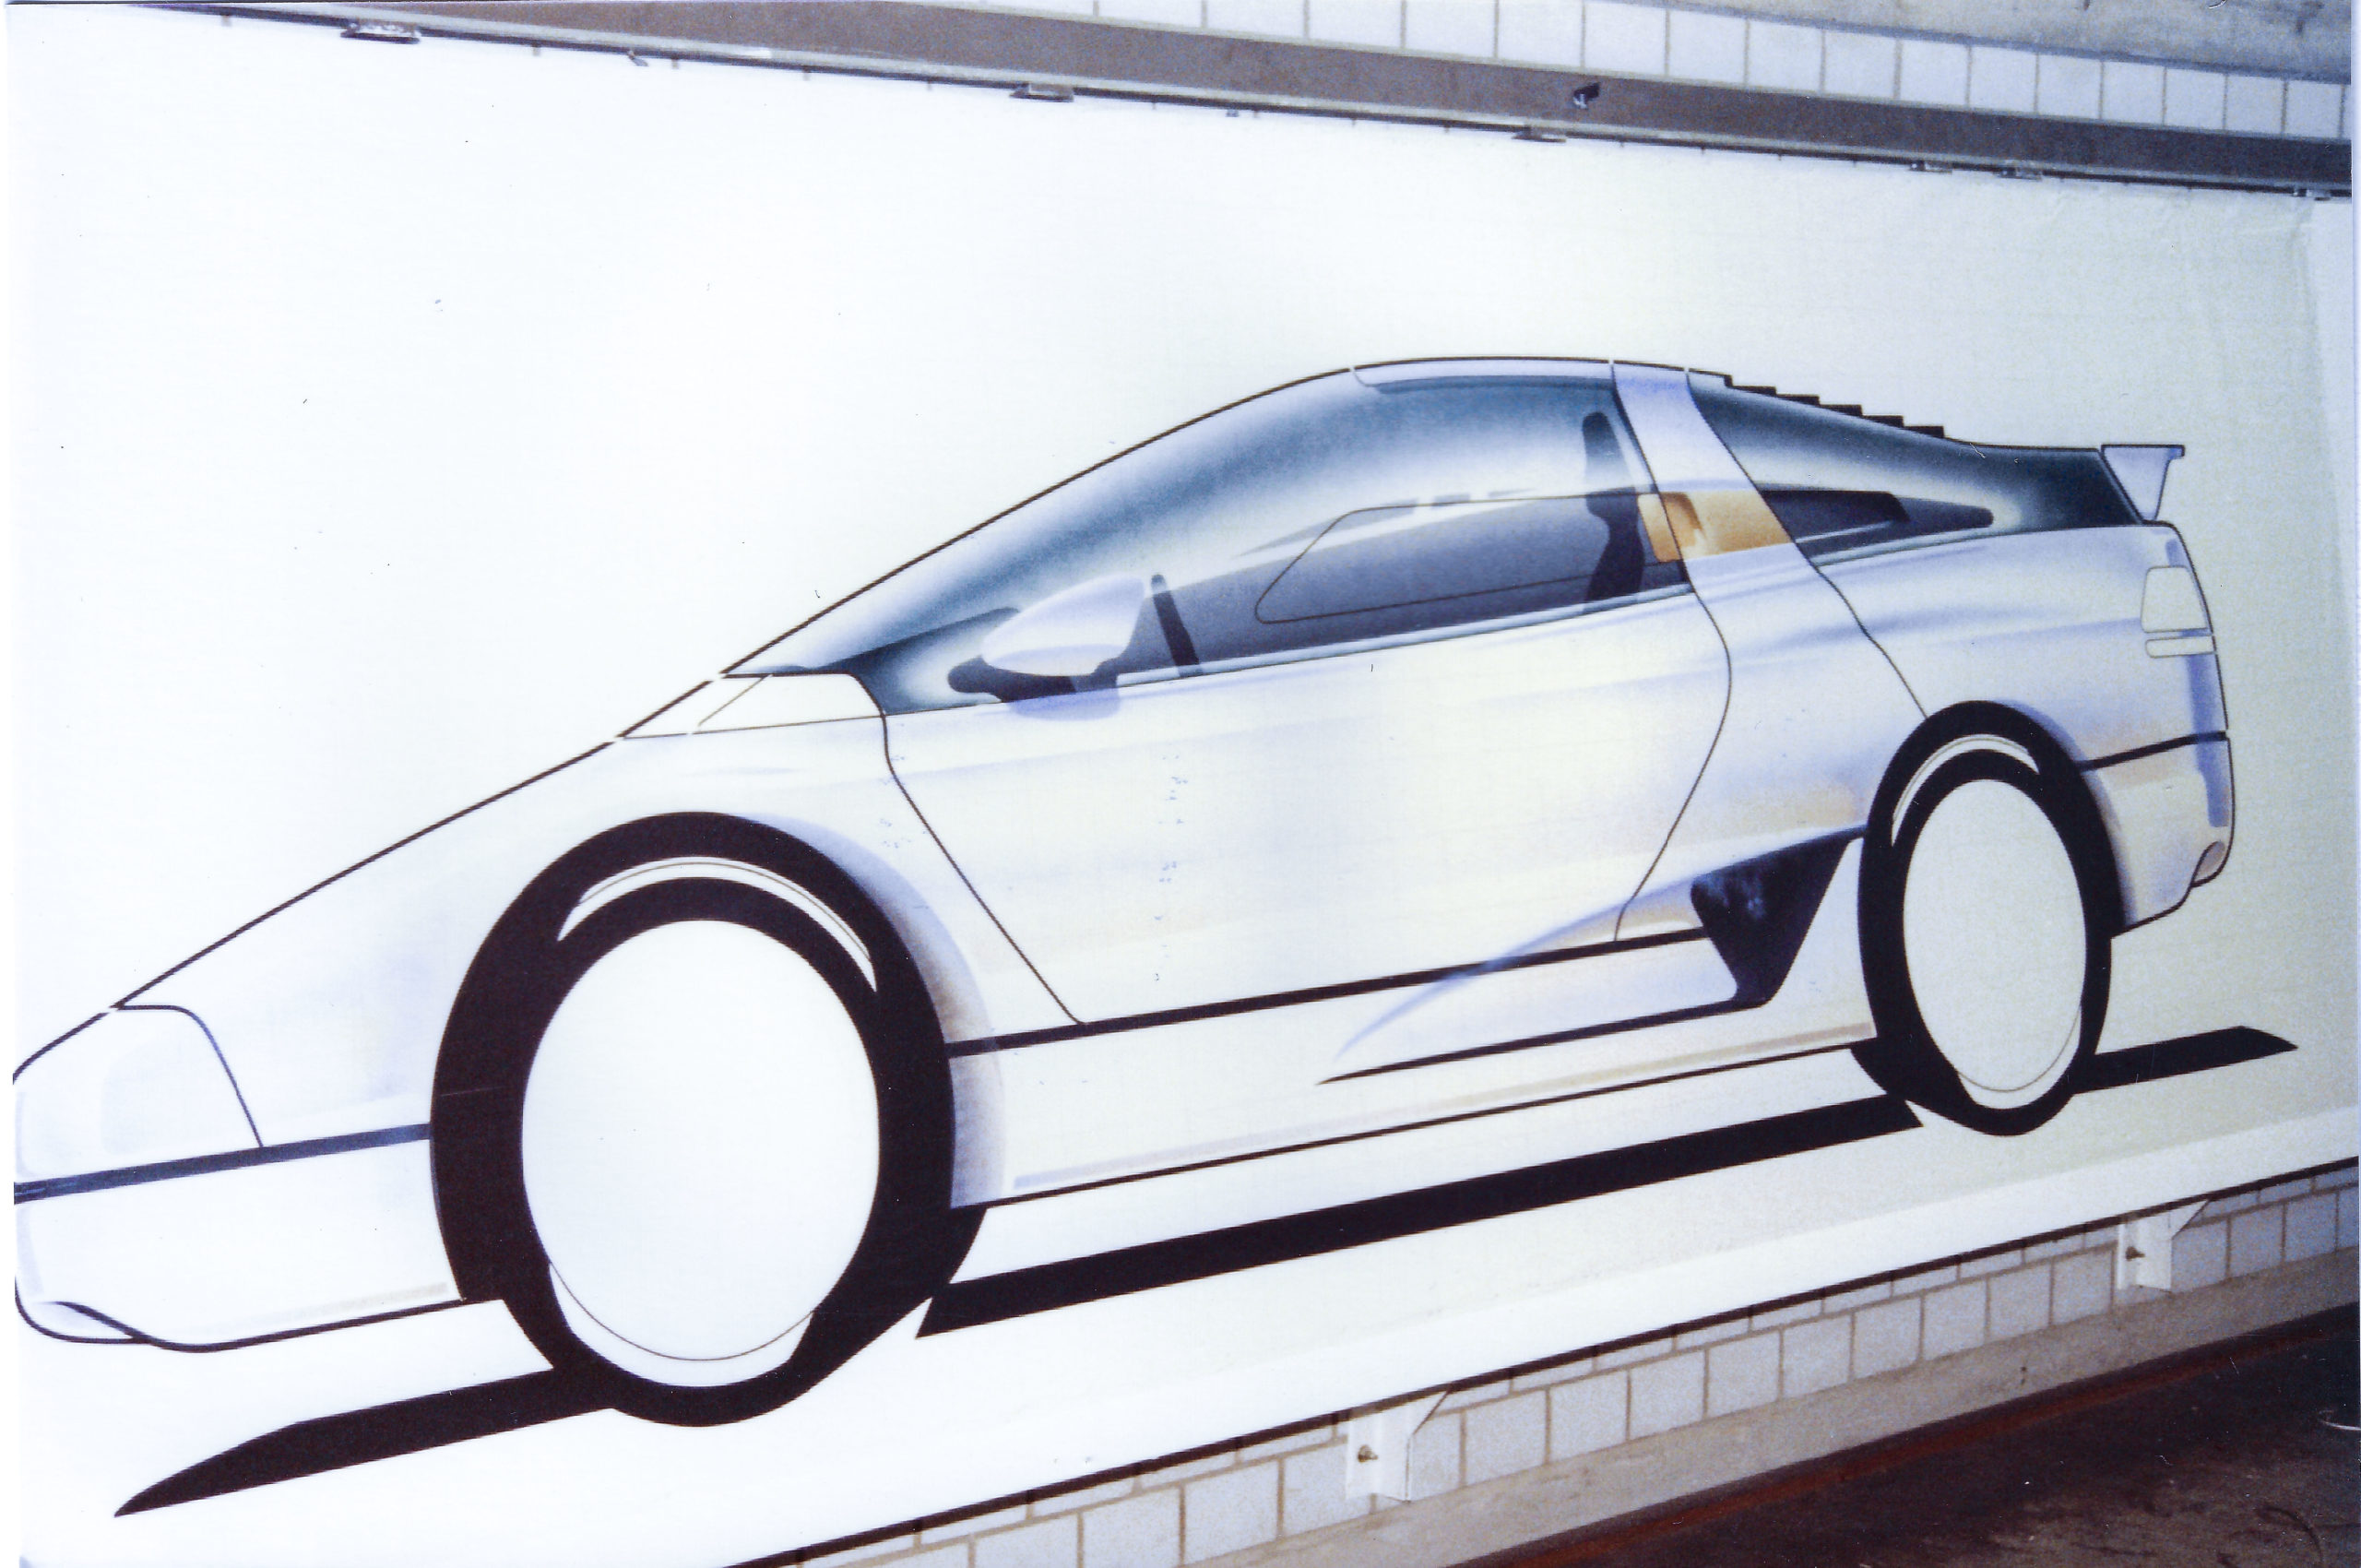
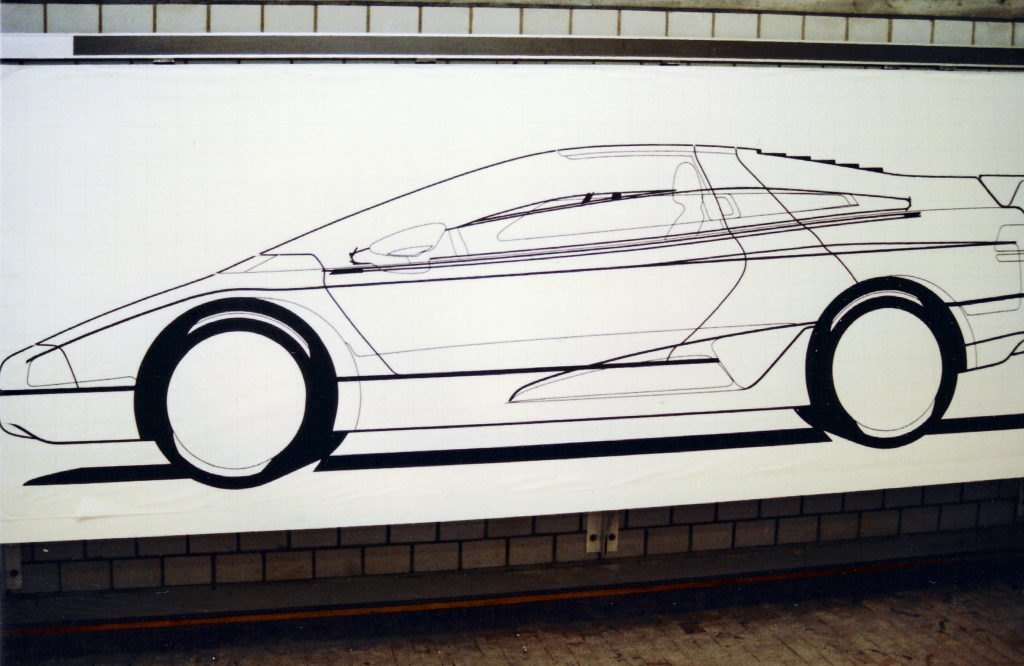
Once the main tapes are all correctly placed and the details are lined out with thinner tapes, you start describing the initial masking areas using thick tapes which make it easier to cut out the masks over without damaging the Vellum used for the rendering. After creating all of the masked areas I normally roll out another layer of Vellum over the whole rendering which I will then use as mask. Since we are using and airbrush I will surround that roll of paper with extra masking sheets to prevent over spray onto the rest of the rendering, the board and the rest of the studio.
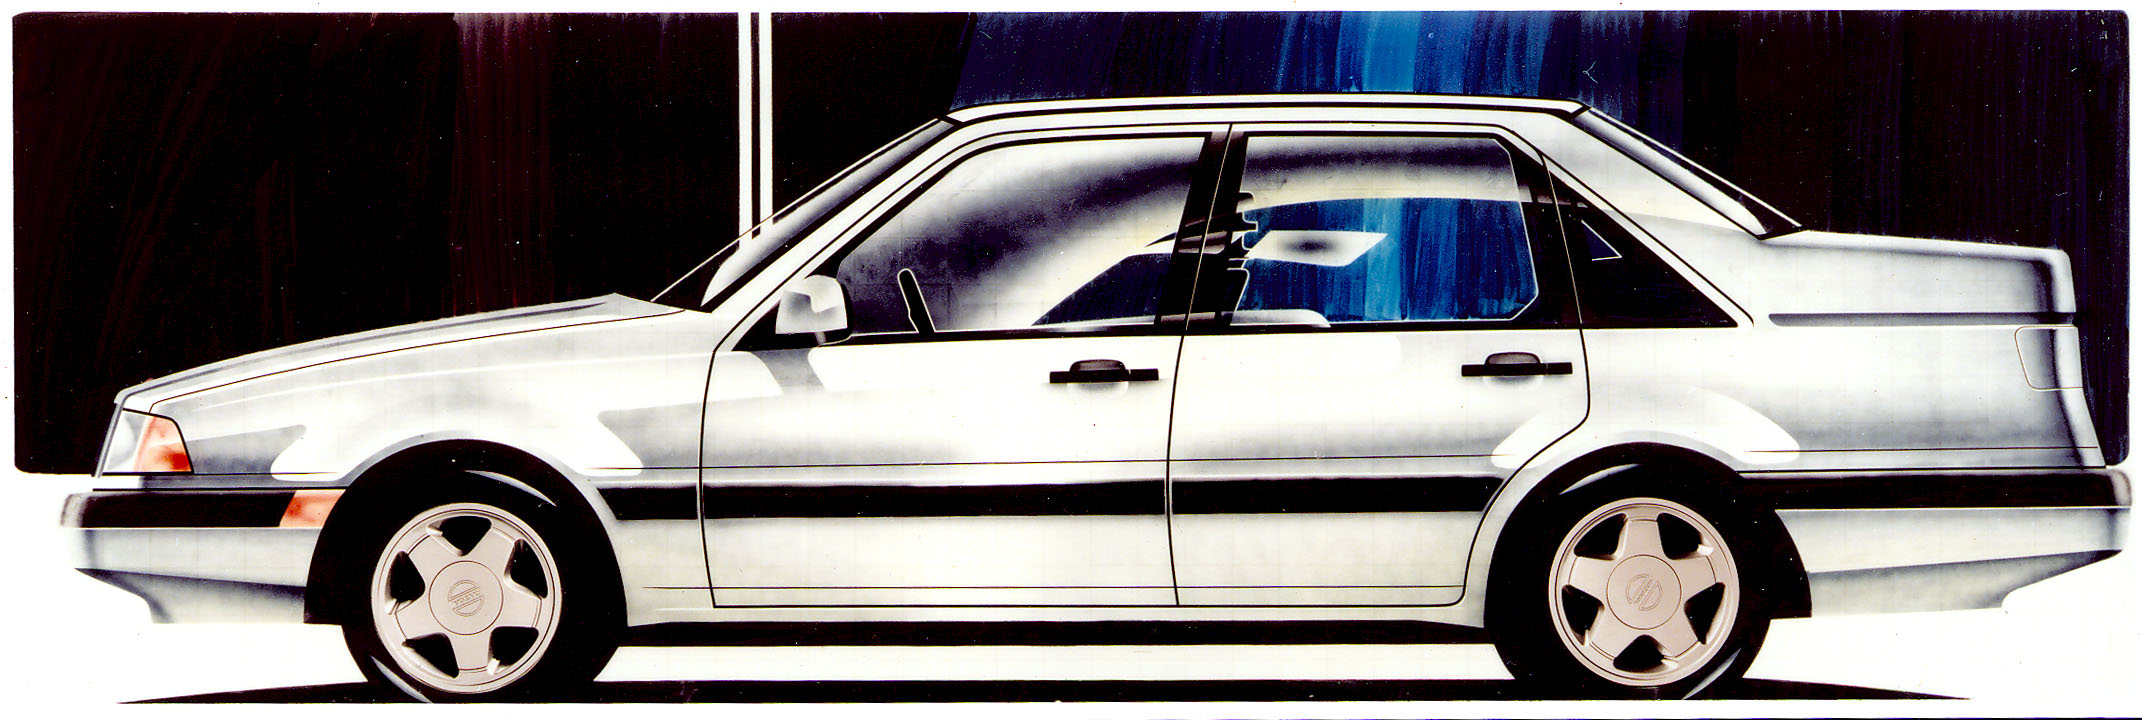
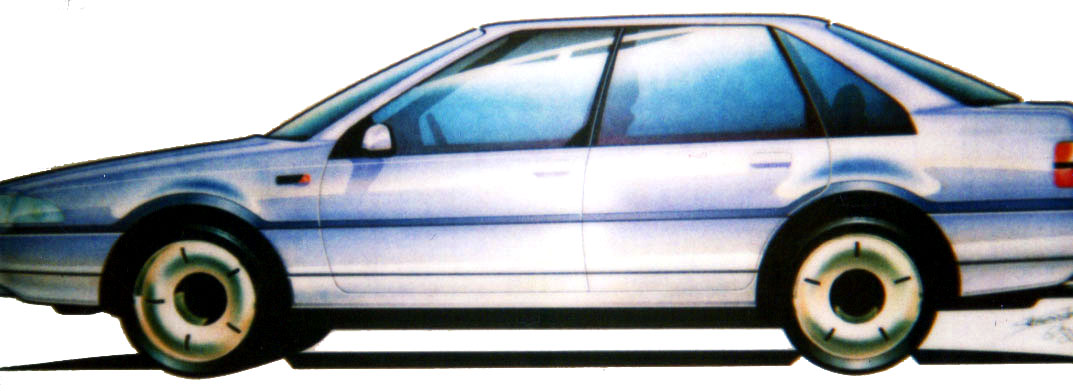
I prefer to do the greenhouse first and normally start by airbrushing the darker area initially. As you can see, I have masked off the seat/headrest area and the steering wheel as well as the opposing side roof and pillars. I will airbrush these black and blue inks till I find the right tone and depth. I will clear off the masks of the seats/steering wheel/roof and pillars and create the opening to render the reflection on the glass area. I use the same colors to create that reflection area, also making sure it is not one single level of tone, since that doesn’t happen in real life either.
Once the refection parts are airbrushed I clear the mask to reveal the darker pillar areas in the main glass first. I again airbrush these in tones making sure it fades to nothing the closer it gets to the glass reflection. Once this is done I take off the mask covering the complete rest of the glass area. I start by airbrushing my main blue tint over that whole area suggesting the sky reflection and then change to black to get it a tone closer in relationship to the colors used for the glass reflection. As you can see, the mirror area remained covered while I was working on the greenhouse.

Following the German “Less is More” strategy I decided to make the main body color a light metallic Mauve, a very popular color in the late 80’s. That meant I had to be cautious with the amount of color I applied, but the advantage would be that if I messed up I could easily apply a darker color instead. Remember, these were the days and materials where there was no “edit/undo”. As a contrast to the mauve metallic I wanted to use a matte soft gold on the hand grip area as well as on the wheels. To to these and the mirrors I created ample sized local masks to allow me the freedom to spray from a reasonable distance so I could check the balance of the colors.
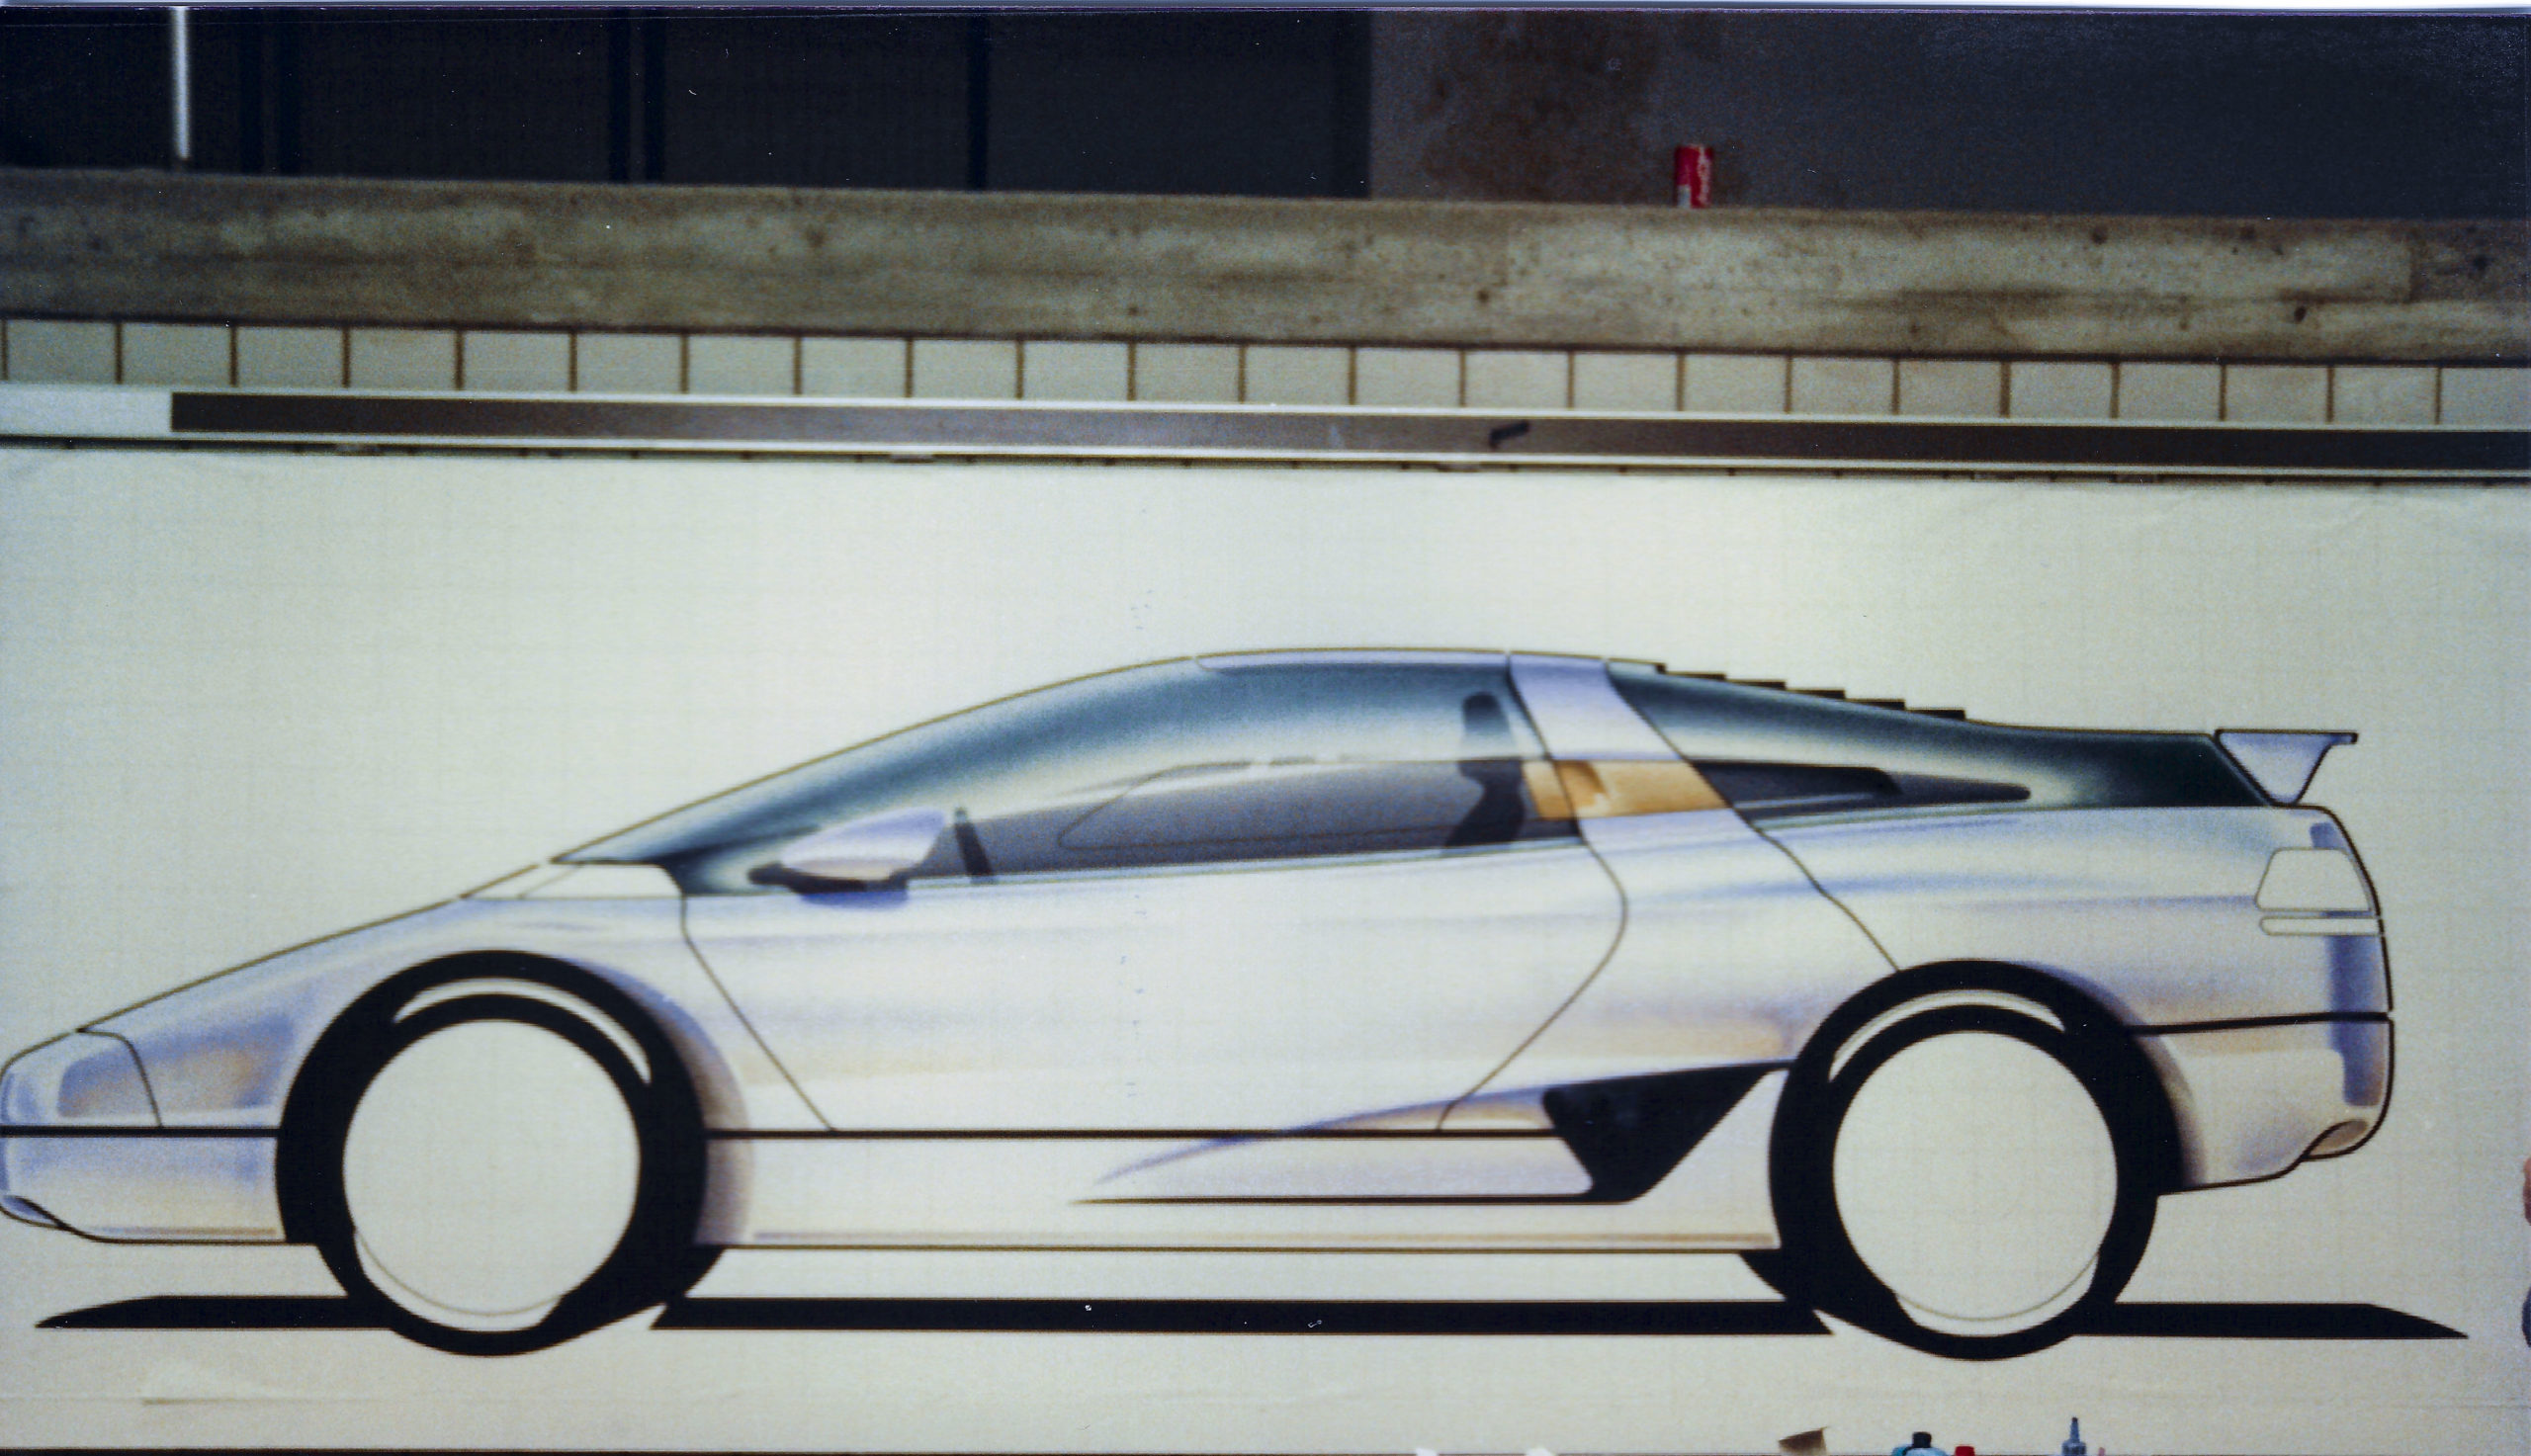
That led me to the lower main body area. I started at the rear with a very subtle layer of the main body color. Since I wanted the main highlight over the body to be in the center, I went from the rear fading towards the center, and would later go from the front and fade towards the center. After gradually building up the tone that I wanted I added some orange/yellow towards the lower areas and some blue over the finder highlight so I would get the warm/cold effect that gives it more 3 dimensions.

Subsequently I started to apply that same logic to the colors on the front, where the hood area now received the blue tones as well, and again the darker orange/yellow also in the rear of the wheel arches to suggest they were turning in to let the air be released from within the wheel well easier.
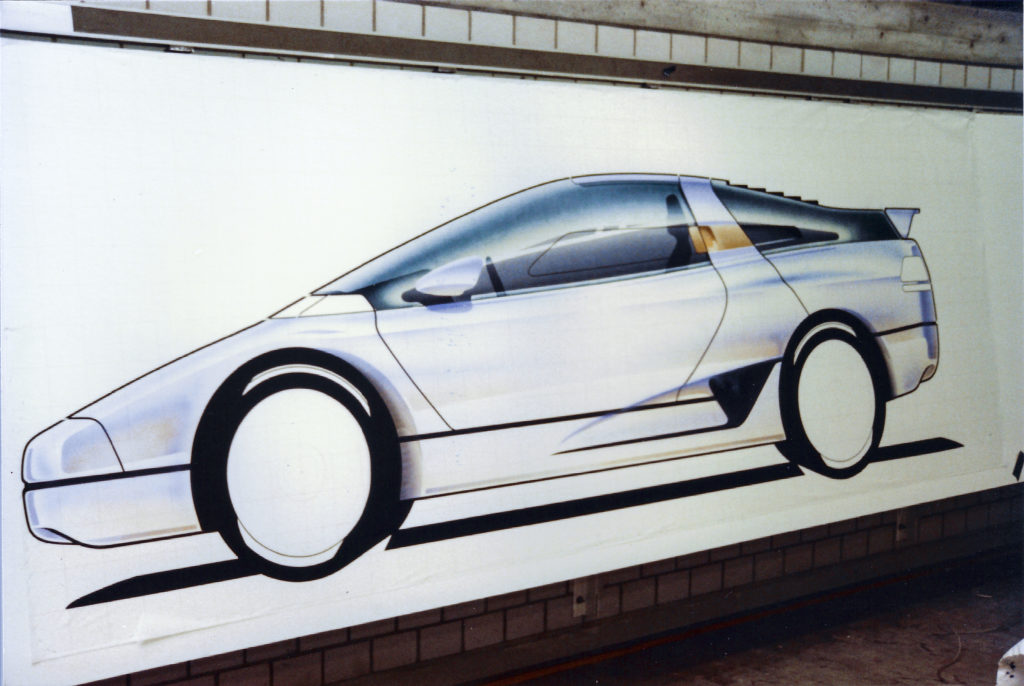
In side view it started to come together as I had hoped for, which meant I still had to airbrush the headlight and taillight details as well as the shading over the tires and both wheels. Conventionally we would leave the wheels blank so we could add various designs to the rendering at any stage, but since this was a class I decided to actually render the wheels on the actual tape rendering.
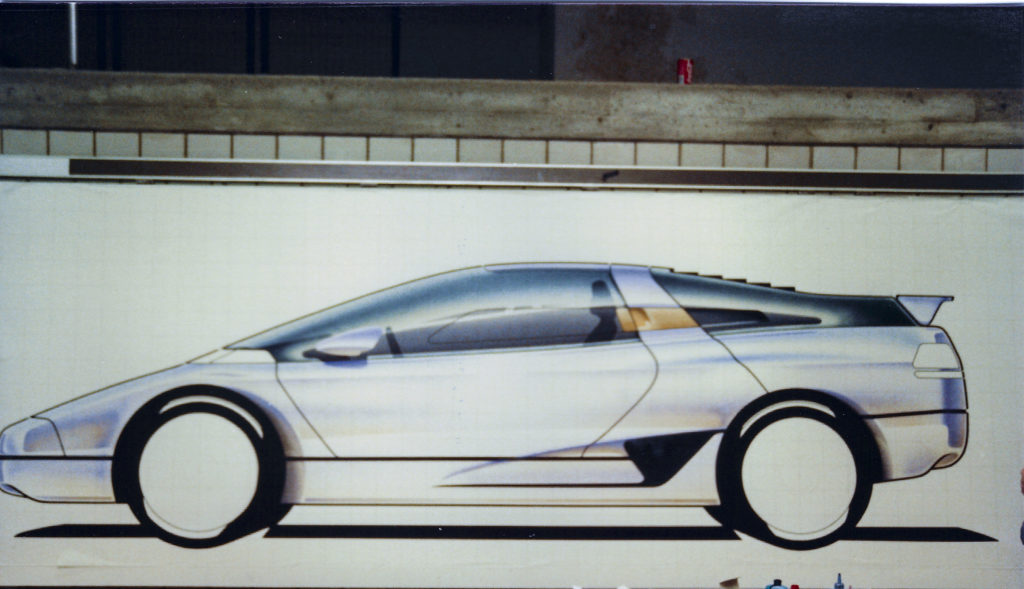
I liked how the headlight and taillight had come out, but in retrospect could’ve made the tire reflections a bit darker to express the rubber more closely, but at the time I was keen on glossy new tires.

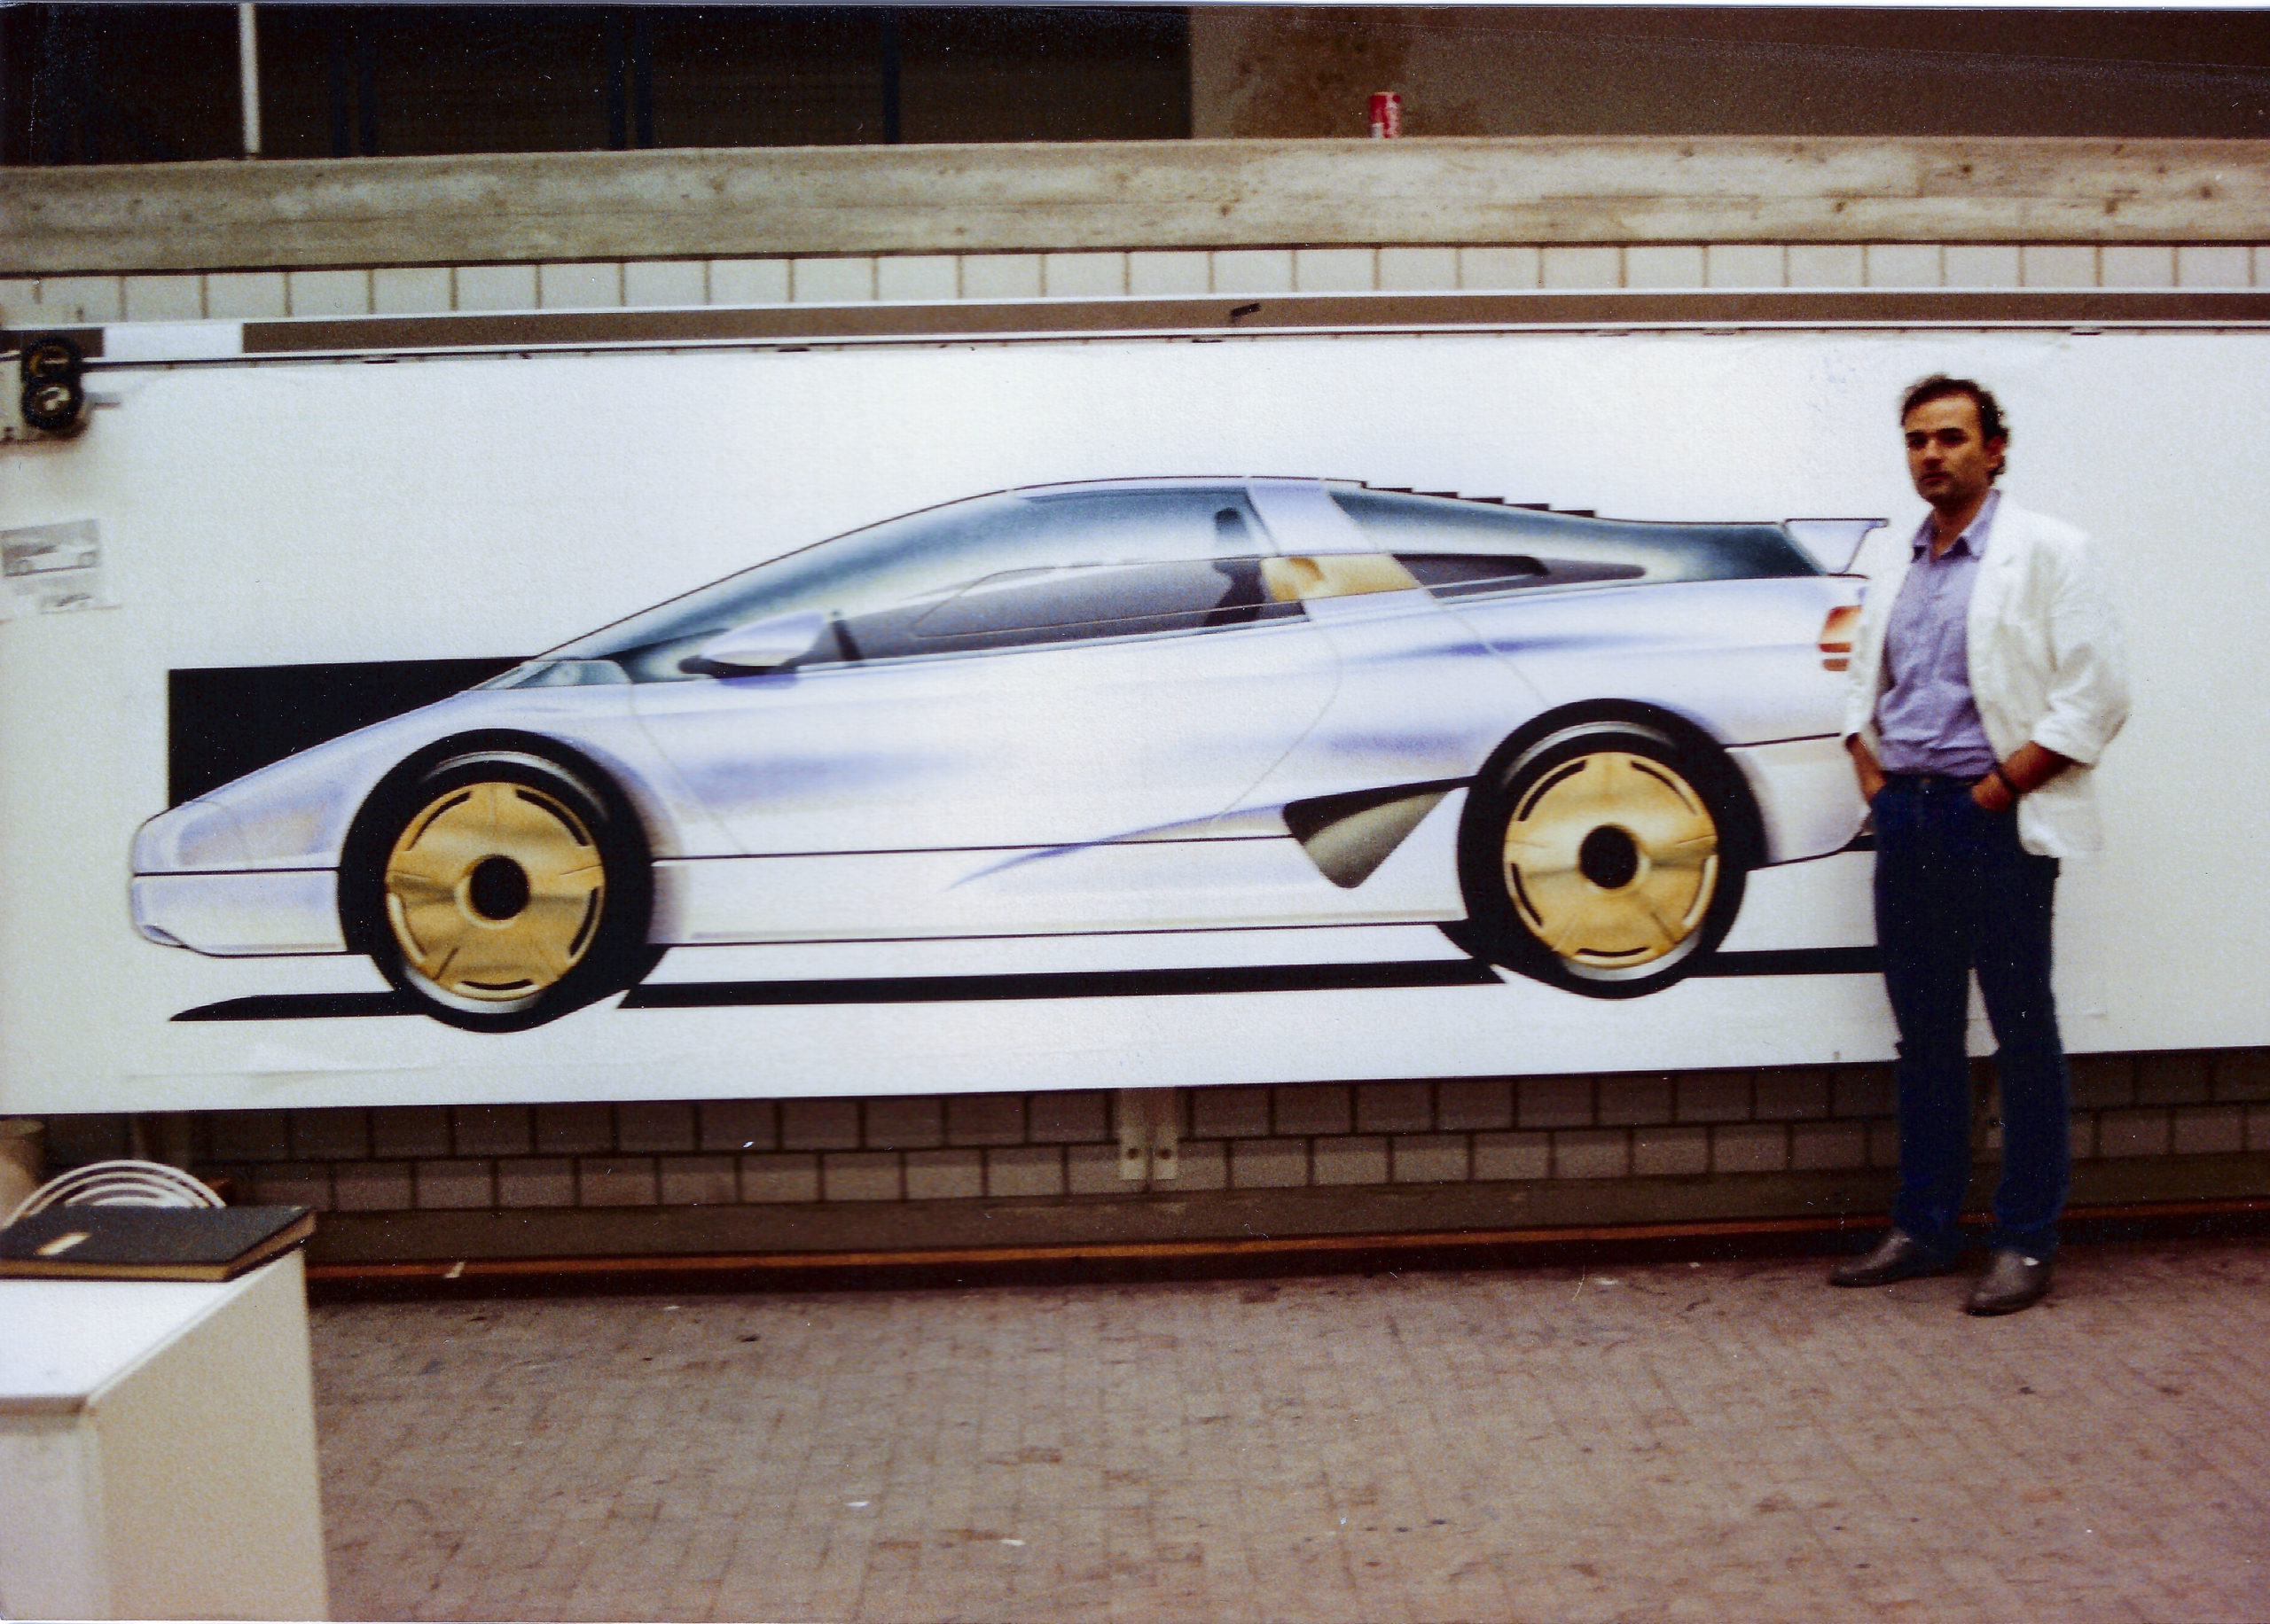
As you can see in foreground on the table, quite a lot of materials were used to get this done over the 5 days of the course. There was quite a lot of mess to clean up, so be aware before attempting this, to make sure you have an area that can and will get dirty and ensure you clean up after. Also, since you are using airbrush, good ventilation is highly recommended, and use of actual airbrush inks is recommended as well. You don’t want to end up using poisonous paints since that will seriously endanger your health.
After the cleanup proudly standing next to the work. I hope this was of interest to you!